Estimated reading time: 11 minutes
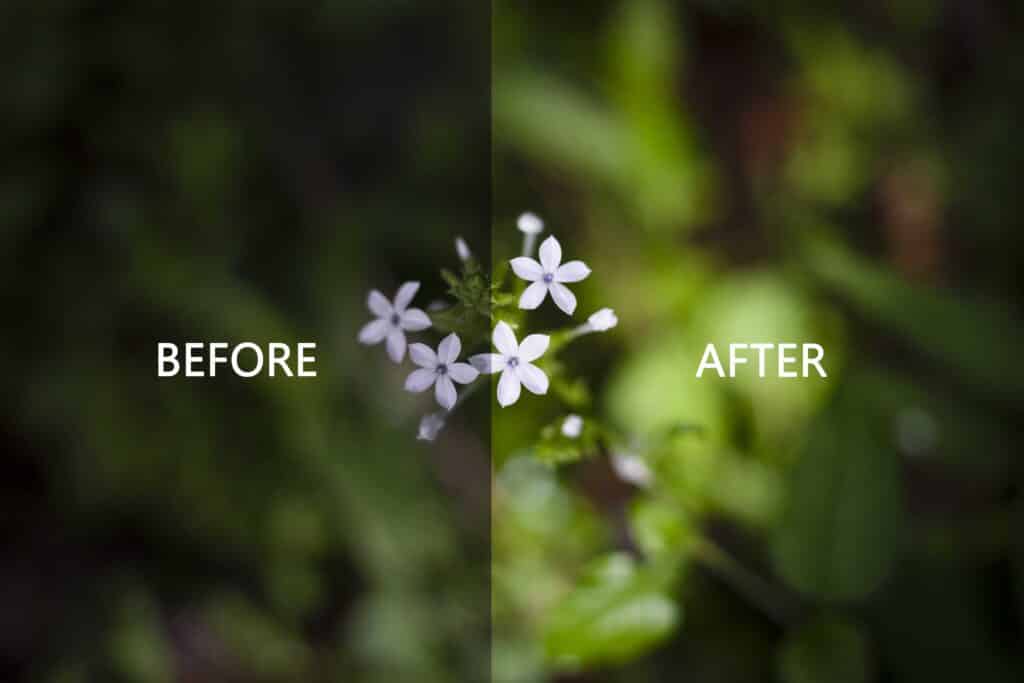
Dodging and burning is a technique that has been used by photographers for centuries to improve the overall look of their images. The process is simple: by lightening or darkening specific areas of an image, you can create depth, contrast, and dimension that wouldn’t otherwise be possible. In the past, dodging and burning was a time-consuming process that had to be done in the darkroom. But thanks to Lightroom, dodging, and burning can now be done quickly and easily, with just a few clicks of the mouse. In this blog post, we’ll show you everything you need to know about dodging and burning in Lightroom. We’ll cover the basics of what dodging and burning are and how to do it in Lightroom. We’ll also share some tips and tricks for getting the most out of this powerful tool.
Getting Started With Dodging And Burning In Lightroom
Dodging and burning is a processes that can be used to improve the look of your photos in Lightroom. This process involves adjusting the brightness, contrast, and color of individual photos. By following these three steps, you can get started with dodging and burning.
First, set up your dodging and burning workspace. In this workspace, you will use two panels: the Library Panel and the Develop Module Panel. The Library Panel will show all of your photos, while the Develop Module Panel will contain your tools for dodging and burning.
The first step of the dodging and burning process is to select a photo to work on. You can do this by clicking on it in either panel or by using keyboard shortcuts (CTRL+A/CMD+A). Once you have selected a photo, you will see the Dodge Tool ( ) and Burn Tool ( ) icons displayed at the bottom of each panel. Clicking on these icons will open up their respective panels.
The Dodge Tool allows you to adjust the brightness, contrast, redness, greenness, luminosity, white balance, vibrancy, sharpening, black point , masking, highlight recovery, shadow recovery, and edge detection. You can also change how colors are affected by this adjustment by changing the blending mode options (). The Burn Tool allows you to adjust exposure (+/-5EV), saturation (+/-5%), hue (+/-10%), lightness (-100% to +100%), middle-tone adjustment (-50% to +50%), shadow detail (-50% to +75%)…and more!
After making any necessary adjustments with either tool(s), click on the OK button at the bottom right corner of each panel. This will apply those changes to the current selection only. If you want those changes applied globally to all photos in the current folder or project, then use the Apply To Entire Folder/Project button at the top left corner instead. Remember that global settings are stored as Local Settings, so they’ll survive even if you switch between different computers or quit Lightroom altogether. Don’t worry if some parts of your image seem too bright or dark after applying dodge/burn – just play around until things look good to you!
Now let’s move on to Step 2 – fine-tuning our adjustments! As we mentioned earlier, there are many different factors that can affect our results when dodging /burning – so it’s important that we give each one its own attention before moving on to the next photo. To do this, we need to revisit our original selection (or any new selections made since the last step) and make further tweaks according to the specific needs of each image. Here are a few tips for doing just that:
– Sometimes it might be necessary to increase exposure slightly for highlights while reducing exposure overall elsewhere in an image for greater detail preservation;
– It might be necessary to reduce brightness overall but increase saturation levels specifically where needed, such as adding punchy details near edges;
– If the color looks off compared to the original version, then usually tweaking hues isn’t going to solve the problem – try increasing/decreasing blacks & whites instead; etcetera. etcetera………. 🙂
The Basics Of Dodging And Burning
Dodging and burning are two key photographic techniques that can be used to improve your photography. In this section, we will provide a brief explanation of these techniques, and show you how to use them in Lightroom.
What is Dodging and Burning?
Dodging is the process of dodging out shadows or highlights in an image. By dodging out these areas, you can create a more balanced image with less emphasis on any one particular area. For example, if you want to darken an area in an image, you can dodge out the light areas around it. Similarly, if you want to lighten an area in an image, you can dodge the dark areas around it.
How to Dodge and Burn in Lightroom
To use dodging and burning in Lightroom: 1) select the area that you want to Dodge or Burn; 2) choose the appropriate tool from the toolbar (such as the Brush tool or Quick Selection tool); 3) make your selection by clicking and dragging over the desired area; 4) click on the Exposure Compensation button (to the right of histogram), then set your Exposure compensation value using the dials at the bottom of screen; 5) hit OK to finish your adjustments.
How To Dodge And Burn In Lightroom
If you’re like most photographers, you probably love to dodge and burn in your photos. Dodging and burning is a technique that allows you to change the light in your photo without having to adjust the exposure or color settings. There are many benefits to using dodging and burning in Lightroom, so it’s important to understand how it works. In this section, we’ll explain all of the basics about dodging and burning in Lightroom, as well as give you some tips on how to get the most out of these techniques.
Dodging and burning can be used for a variety of purposes, such as adjusting the brightness and contrast of your photo, adding texture or drama, or altering the color balance. The benefits of using dodging and burning depend on which purpose you’re using it for. For example, if you’re trying to add texture or drama to your photo, then dodging may be more effective than burning. However, if you’re trying to adjust the brightness or contrast of your photo, then burning will usually be more effective than dodging.
There are a few things that you need to keep in mind when dodging and burning in Lightroom:
– Always use lightness/darkness adjustments first
– Use small sample sizes before making large changes
– Be aware of halos & lens flare
Tips And Tricks For Dodging And Burning In Lightroom
Dodging and burning in Lightroom can be a great way to add some color and interest to your photos. However, it can be tricky to get the most out of this feature. In this section, we will provide you with the basics of Dodge and Burn, as well as tips and tricks for using the tools in Lightroom. Hopefully, this will help you to get the most out of your dodging and burning!
There are a few basic principles that you need to keep in mind when dodging and burning in Lightroom. First, be sure to use the right tool for the job. Dodge is best used for adding lightness to your photos, while Burn is better suited for darkening or highlighting areas of your photo. Second, pay attention to how much contrast you are increasing or decreasing with your dodge and burn tools. Too much contrast will result in a harsh image, while too little will leave your photo looking flat and unprofessional. Lastly, always experiment with different techniques until you find something that works best for you. The basics of dodging and burning are really simple once you know how to use them, so don’t hesitate to give it a try!
Advanced Dodging And Burning Techniques In Lightroom
Advanced dodging and burning techniques in Lightroom can help you to create creative images that are unique and stand out. By using the adjustment brush, you can dodge and burn areas of your image to create a variety of effects. Additionally, by creating a new layer in Photoshop, you can use the dodge and burn tools to achieve precise results.
One of the most important aspects of advanced dodging and burning is understanding how to use curves. By manipulating these curves, you can achieve amazing results that would be difficult or impossible with just the adjustment brush alone. Finally, remember that light affects both dark and light areas differently, so be sure to experiment with different lighting conditions to see what works best for your images.
There are a number of different ways to dodge and burn in Lightroom. One popular technique is to use the adjustment brush. By painting with this tool, you can create subtle or dramatic changes to your image. Additionally, by creating a new layer in Photoshop and using the dodge and burn tools, you can achieve much more precise results.
One of the benefits of using curves when dodging and burning is that they allow you to control how much change each area of your image receives. By manipulating these curves, you can create images with an amazing range of effects. In addition, remember that light affects both dark and light areas differently – be sure to experiment with different lighting conditions to see what works best for your images.
Advanced dodging and burning techniques are essential for creating unique images that stand out from the crowd. By understanding how to use the adjustment brush as well as curves, you can create stunning results that will amaze your friends and family members.
How To Create Custom Brushes For Dodging And Burning In Lightroom
If you’re looking to add some depth and realism to your photos in Lightroom, then you’ll want to learn how to create custom brushes. In this section, we’ll explain the benefits of using custom brushes, as well as how to do it. We’ll also provide a few tips on how to use them most effectively. So don’t wait any longer – get started creating custom brushes today!
When you’re working with images in Lightroom, it can be helpful to add some extra detail and dimension. One way to achieve this is by using custom brushes. By creating your own brush, you can customize the appearance of the pixels used to create the image. This can give your photos an added level of realism and depth.
There are a few benefits to using custom brushes: firstly, they can give your photos a more customized look; secondly, they’re often faster and easier to use than built-in Lightroom brushes; and finally, they’re often more accurate than generic brushes. So if you’re looking for ways to improve your photo editing skills, then custom brushes may be just what you need.
Making The Most Out Of The History Panel When Dodging And Burning
When dodging and burning in Hearthstone, it is often important to know the history of your cards in order to make the best decisions. The history panel provides a detailed look at card interactions over time, which can be invaluable when making plays. In this section, we will discuss some of the benefits of using the history panel, as well as tips and tricks for getting the most out of it.
The history panel can be used to see how different cards have been played against each other over time. This information can help you make better decisions when playing them yourself, or when playing against others. For example, if you know that a particular card is strong against another card in the opponent’s deck, you can choose not to play that card even if it might seem like a good idea at first glance.
Additionally, knowing how cards have been played against each other can give you an insight into future matchups. For example, if you know that a certain deck relies heavily on minions with low health (such as Warrior), then you may want to mulligan away any low-health minions before playing your more powerful ones. This knowledge allows you to anticipate what opponents are likely to do and makes gameplay more strategic.
Finally, knowing the history of your cards can also provide insights into how they should be played in specific situations. For example, if you know that a certain spell works best when used early in the game (due to its high cost), then try casting it as soon as possible instead of waiting for a better opportunity later on in the game. By taking advantage of these insights, gameplay can become much more fluid and consistent overall!
Common Mistakes To Avoid When Dodging And Burning
Dodging and burning are two common photo editing techniques that can be used to improve the appearance of a photo. However, they can also have unintended consequences. By following these tips, you can avoid some of the most common mistakes made when dodging and burning.
Not using the right brush size is one of the most common mistakes made when dodging and burning. If you’re using a small brush, it won’t be able to cover the entire area that you want to burn or dodge. This will lead to inconsistent results and a poorer overall result.
Forgetting to check the mask overlay is another mistake that often occurs when dodge and burning photos. If your mask is incorrect, it will cause unwanted areas in your photo to become burned or dodged. Make sure to always check your mask before beginning any editing operation!
Dodging and burning the same area multiple times is also a common problem. This happens because we humans are naturally drawn to patterns, so we tend not to stray too far from what we’ve seen before. Repeating this process over and over again eventually leads to an unappealing result on your picture.
To Wrap Things Up
A lightroom is a powerful tool that can help you improve your photos. In this blog post, we have covered the basics of dodging and burning, as well as some tips and tricks for using these tools. We hope that this post has inspired you to try out some of these techniques on your own photos. As always, practice makes perfect, so don’t be afraid to experiment!
Note: If you want to make some adjustments to the photo just let me know. I can do it for you at a very low cost. You can hire me to edit your photo
latest post
- What is Midjourney
 Discover the capabilities of Midjourney AI, learn how to effectively utilize the platform, and explore the advantages and disadvantages of the Midjourney AI image generator across its different pricing options.
 - Brand identity elements
 In the vast marketing universe, imagery is pivotal in establishing and nurturing a brand’s identity. A brand’s visual choices are not merely aesthetic decisions but strategic moves that can significantly influence perception and performance. This Picfixs article explores the intricacies of selecting imagery that complements and enhances a brand’s essence, ensuring it resonates with the… Read more: Brand identity elements
 - 100 Best Mountain Captions and Mountain Quotes for Instagram
 Ready to scale new social media heights? Look no further than this treasure trove of 100 exhilarating captions and quotes, handpicked for your Instagram mountain posts!
 - Symmetry in Photography: A Creative Approach with Examples
 Delve into the enchanting realm of symmetry in photography as we showcase mesmerizing examples on our website. Experience the allure of perfectly mirrored images!
 - 11 Quarantine Photoshoot Ideas to Try at Home for Amazing Photos
 Looking for unique photoshoot ideas during quarantine? Explore the 11 creative suggestions that will help you capture unforgettable moments at home.
related link
-

What is Midjourney
Discover the capabilities of Midjourney AI, learn how to effectively utilize the platform, and explore the advantages and disadvantages of the Midjourney AI image generator across its different pricing options.
-

Brand identity elements
In the vast marketing universe, imagery is pivotal in establishing and nurturing a brand’s identity. A brand’s visual choices are not merely aesthetic decisions but strategic moves that can significantly influence perception and performance. This Picfixs article explores the intricacies of selecting imagery that complements and enhances a brand’s essence, ensuring it resonates with the…
-
100 Best Mountain Captions and Mountain Quotes for Instagram
Ready to scale new social media heights? Look no further than this treasure trove of 100 exhilarating captions and quotes, handpicked for your Instagram mountain posts!