
Table of contents
Want to know how to install Lightroom presets but have no time to read long manuals? I’ve prepared a short 2-minutes guide covering the quickest way to install Lr presets.
This tutorial is for any Lightroom version (Lightroom CC, Lightroom 6 (or older), Lightroom Classic) and for presets in XMP and .lrtemplate files. Download my Lightroom Presets and start editing photos right now.
How to Install Presets in Lightroom (Lr 4, 5, 6 & CC) on Windows:
- Select Preferences in the Edit menu.
- Go to Presets tab and press the Show Lightroom Presets Folder button.
- The folder with presets will open. Choose Develop Presets.
- Copy the folder with your presets here.
- Restart Lightroom.
How to Install Presets in Lightroom (Lr 4, 5, 6 & CC) on Mac:
- Open Lightroom.
- Select Preferences in Lightroom menu.
- Go to the Presets tab and press the Show Lightroom Presets Folder button.
- The folder with presets will open. Choose Develop Presets.
- Copy the folder with your presets here.
- Restart Lightroom.
Universal Way of Installing Lightroom Presets
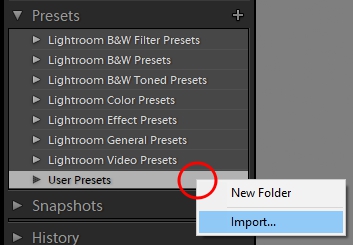
You can install presets to Lightroom by pressing several buttons. Open Lightroom, go to Develop tab, right-click on the Presets window and select Import. Choose the preset file and it will be imported.
Note: If you want to make some adjustments to the photo just let me know. I can do it for you at a very low cost. You can hire me to edit your photo.
Latest Post
- What is MidjourneyDiscover the capabilities of Midjourney AI, learn how to effectively utilize the platform, and explore the advantages and disadvantages of the Midjourney AI image generator across its different pricing options.
- Brand identity elementsIn the vast marketing universe, imagery is pivotal in establishing and nurturing a brand’s identity. A brand’s visual choices are not merely aesthetic decisions but strategic moves that can significantly influence perception and performance. This Picfixs article explores the intricacies of selecting imagery that complements and enhances a brand’s essence, ensuring it resonates with the… Read more: Brand identity elements
- 100 Best Mountain Captions and Mountain Quotes for InstagramReady to scale new social media heights? Look no further than this treasure trove of 100 exhilarating captions and quotes, handpicked for your Instagram mountain posts!
- Symmetry in Photography: A Creative Approach with ExamplesDelve into the enchanting realm of symmetry in photography as we showcase mesmerizing examples on our website. Experience the allure of perfectly mirrored images!
- 11 Quarantine Photoshoot Ideas to Try at Home for Amazing PhotosLooking for unique photoshoot ideas during quarantine? Explore the 11 creative suggestions that will help you capture unforgettable moments at home.