When it comes to processing digital images, you have a plethora of tools at your disposal, and the process can appear to be somewhat complicated at times. To get the most out of my images, I like to use a combination of Adobe Lightroom and Adobe Photoshop. Perhaps one of these days I’ll add Capture One to the mix, but for the time being, all of my postproduction work is done with Adobe
software. The Dehaze tool, which is available in both Lightroom and Photoshop, is covered in this brief tutorial.
In 2015, Adobe released the Dehaze tool as part of a CC software update. The Dehaze control, as the name implies, allows users to adjust how fog, haze, and mist appear in their images. The slider control allows you to reduce or increase the amount of haze depending on which way you slide the controller. To be honest, I didn’t use it all that much until about a year after it was integrated into the software. I began tinkering with it for fun, mostly to see what it was capable of, and I discovered that this tool is useful for much more than simply adjusting whatever haze may appear in your images. The Dehaze tool has become one of my go-to resources for adjusting image contrast and detail in my post-processing workflow due to its unique ability to adjust image tone while impressively preserving colors and details without completely crushing your shadow areas. I rarely use the control to adjust any actual haze within my images because I rarely have a lot of haze in my shots out here in the desert. Instead, I’ve discovered that when used correctly, this tool can be extremely useful for bringing out
details in lighter and slightly overexposed areas of my images. Dehaze has been especially helpful in bringing out more details in my skies and distant horizon lines, at least for my work

The only difference between the two shots in the simple before and after comparison above is that the Dehaze tool was used selectively to process the “After” image. By selectively applying the Dehaze adjustment, you can see how much more of the sky came out in the edit.

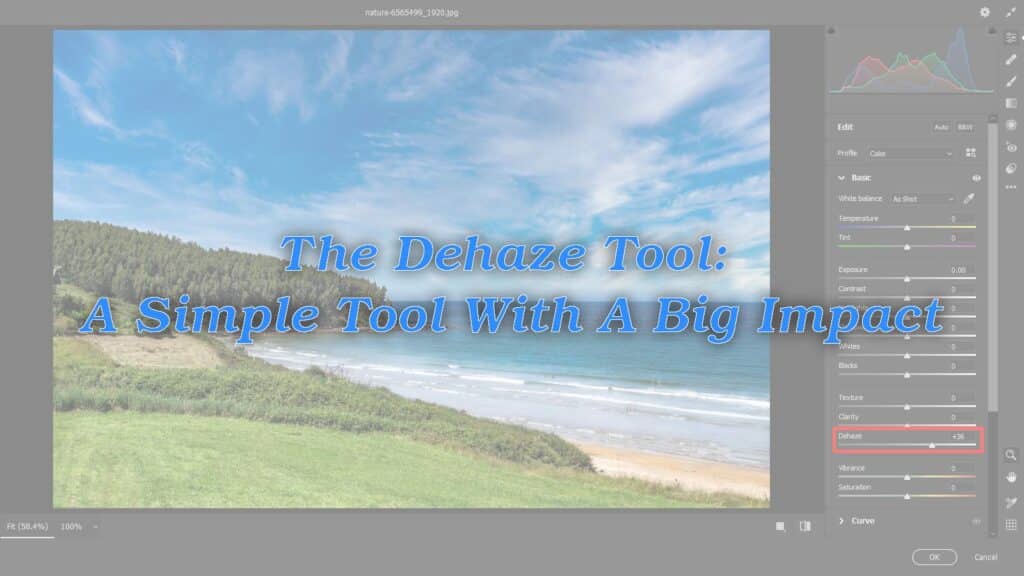
The shot in this example is the one you can see my work on in the given picture above. In the picture, I demonstrate how I use the Dehaze tool in Lightroom and Photoshop. I find myself using this tool all the time and in all of the programs for my own images. Because of its unique control over image tones, I’ve even used the adjustment tool when processing portraits on occasion. I appreciate how quick and powerful this tool is, and how simple it is to use, resulting in better images with less computer time. Please leave a comment if you found this useful or if you have discovered other uses for the Dehaze tool that I haven’t mentioned
Note: If you want to make some adjustments to the photo just let me know. I can do it for you at a very low cost. You can hire me to edit your photo.
latest post
- What is MidjourneyDiscover the capabilities of Midjourney AI, learn how to effectively utilize the platform, and explore the advantages and disadvantages of the Midjourney AI image generator across its different pricing options.
- Brand identity elementsIn the vast marketing universe, imagery is pivotal in establishing and nurturing a brand’s identity. A brand’s visual choices are not merely aesthetic decisions but strategic moves that can significantly influence perception and performance. This Picfixs article explores the intricacies of selecting imagery that complements and enhances a brand’s essence, ensuring it resonates with the… Read more: Brand identity elements
- 100 Best Mountain Captions and Mountain Quotes for InstagramReady to scale new social media heights? Look no further than this treasure trove of 100 exhilarating captions and quotes, handpicked for your Instagram mountain posts!
- Symmetry in Photography: A Creative Approach with ExamplesDelve into the enchanting realm of symmetry in photography as we showcase mesmerizing examples on our website. Experience the allure of perfectly mirrored images!
- 11 Quarantine Photoshoot Ideas to Try at Home for Amazing PhotosLooking for unique photoshoot ideas during quarantine? Explore the 11 creative suggestions that will help you capture unforgettable moments at home.