10 best retouch tips for photographers
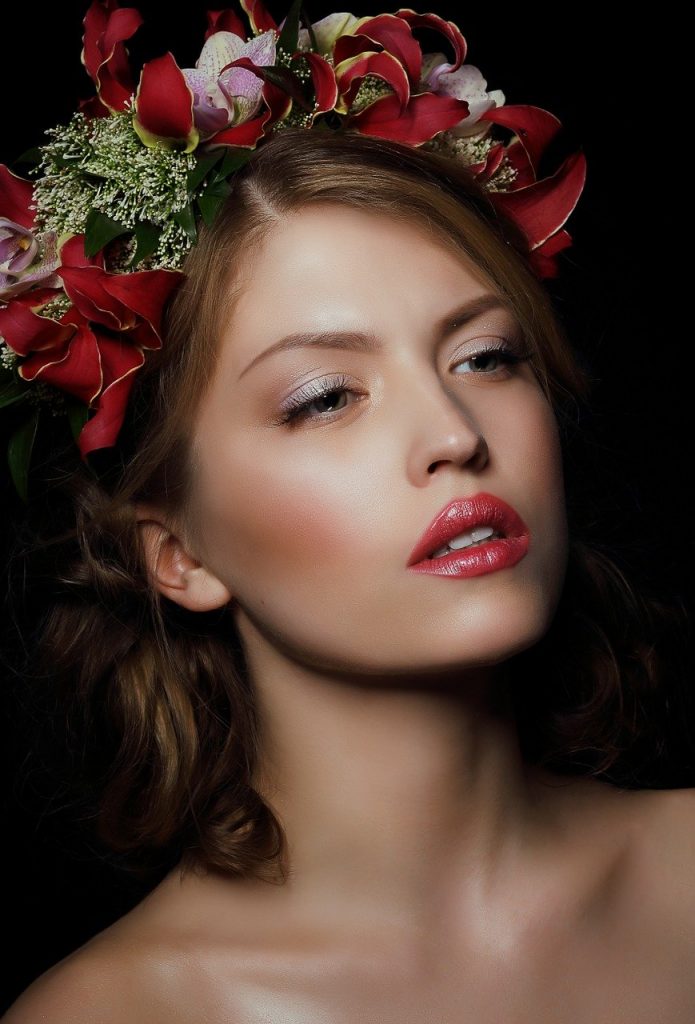
1. Eliminate skin imperfections
Acne, wrinkles or scars on the face significantly ruin the impression of portrait photography. However, even these disadvantages can be eliminated by applying Photoshop tools.
With the healing brush, it is possible to restore sections of shots using the appropriate fragments taken as a sample. The spot healing brush tool automatically selects pixel samples from the area around the retouched fragment.
To achieve smooth skin, I suggest resorting to the frequency separation technique. It separates the texture in the shot from its tone and color. As a result, you will be able to tweak particular areas, and apply Gaussian Blur to smoothen the skin and retain its natural texture.
2. Make the eyes more expressive
Regardless of whether the makeup is present or not, the eyes are supposed to be the most expressive part of the face. You will need to lighten the whites of the eyes but it has to be done carefully so that they don’t appear unnaturally white.
To increase the visibility of highlights and borders, add sharpness. These techniques are often used in fashion photography.
Paint in the masks that you have created to slightly raise the brightness of the bottom part of the eyes, around the iris. A subtle touch on the catchlights for a brighter effect won’t hurt either.
3. Emphasize or add lashes
Thick and beautiful lashes are another way to make your eyes more expressive and a crucial part of the makeup retouching process. For this task, try the dry media brushes bundle. They aren’t only high-resolution but also full of detail and boast rich textures.
Add lashes along their natural growth line and stick to the needed curve. Switch between different brush thickness and intensity values to achieve natural shapes. Also, don’t draw all the lashes at the same length, otherwise, they will appear artificial.
4. Make the eyebrows neat
This retouch makeup point requires you to be extra careful, as it is important to remove excessive hair without making the eyebrows unnaturally accurate. To eliminate all unnecessary elements, apply the Spot Healing Brush tool mentioned above.
Moreover, you can add the missing hairs using the appropriate brushes. Once the excessive hair is eliminated, cover up the “bare” areas with the Stamp Tool (S). Then, hold Alt for cloning bunches of hair prior to painting them onto each brow.
The next step would be to apply the Burn Tool (O) to make each shape darker and more intense. Portrait photographers often take advantage of such tricks.
5. Fix the texture of the lips
Makeup doesn’t look very neat on dry and cracked lips, and portrait photography will only emphasize the undesired effect. Therefore, you should carefully work on the texture of the lips while manipulating makeup in Photoshop.
The defects may be eliminated using the clone stamp tool. In the same way, you will be able to correct the contour of the lips, copying clean areas of skin. The next step would be to align the light and shade on the lips. To do this, you need to raise the curve on the adjustment layer.
With a white brush of a small radius and slight transparency, you will be aligning the light and shade over the entire surface of the lips. In addition, you should pay attention to the color of the teeth. Learn how to whiten teeth in Photoshop by means of this guide.
6. Make the makeup brighter
The camera often dims the colors, so you need to add brightness and saturation to make up Photoshop. For this task, you will have to resort to several adjustment layers. Mind that the intensity of makeup should match the overall atmosphere of the shot.
The suggested adjustment layers are Curves, Gradient Map, and Levels. To begin with, adjust contrast via Curves. After that, settle on Luminosity for a gray Gradient Map. Pay attention to other peculiarities of editing pictures of this genre that are covered in my selection of portrait tutorials.
7. Add contour and highlights
To achieve realistic makeup for Photoshop, you need to figure out how it is actually applied in real life. Skillful makeup artists and regular people put on makeup in order to contour and highlight facial features. Dark shades are necessary for defining the bone structure.
That’s exactly what you have to do while performing makeup retouch. A new layer should be adjusted to soft light. Then proceed to paint a lighter skin tone color with a soft round brush to the parts marked in the picture below.
A second new layer should be adjusted to linear burn. Use this layer to make the cheekbones more defined by means of faded purple color. One of the essential stages of professional makeup retouching is figuring out how to smooth skin in Photoshop.
8. Create eyes makeup
It is possible to add makeup to photo in Photoshop if it is absent on the actual face. Using the adjustments tool, try creating shadows by darkening the outer corner of the eye and adding shine.
Pick a hard round brush to achieve a neater black eyeliner. For the eyeshadows, reduce the hardness value to 0%. I would like to warn you against painting with a brown color. Layer blend modes will result in brown shades appearing with a profound red undertone.
For a more eye-catching effect, discover how to change eyes color in Photoshop.
9. Create eyebrows makeup
To achieve a sharper line across the upper part of the eyebrows, I suggest picking the Pen tool (P) and drawing a path across that area. Then finish the selection (the video will show you how to do it step-by-step). Press Ctrl + Enter (Windows) or Cmd + Return (Mac) to load the path as a selection.
The next step of the eyebrow makeup retouch would be to pick the Lasso tool (L). Using the arrow keys, push the selection downward for overlapping some of the eyebrow hair. After that, create a new layer, pick the Healing Brush tool, and take fragments of the skin from above the eyebrows on the forehead as a sample.
10. Add gloss to the lips
Using the solid color tool in the color overlay mode, it is possible to add the desired shade to the lips. To make the lips more voluminous, take advantage of the Dodge&Burn option as part of Photoshop make up retouching.
In order to quickly add gloss and contrast to lips, create two new layers first. Then pick a very small brush and try painting over the brighter areas of lips with white on one of the new layers. On the other layer, paint over the shaded areas with black.
Click Filter>Gaussian Blur to blur these two layers by a couple of pixels. After that, these two layers should be adjusted to the blend mode Soft Light. The last step of the process would be to lower the opacity until you are satisfied with the result.
- What is Midjourney
 Discover the capabilities of Midjourney AI, learn how to effectively utilize the platform, and explore the advantages and disadvantages of the Midjourney AI image generator across its different pricing options.
 - Brand identity elements
 In the vast marketing universe, imagery is pivotal in establishing and nurturing a brand’s identity. A brand’s visual choices are not merely aesthetic decisions but strategic moves that can significantly influence perception and performance. This Picfixs article explores the intricacies of selecting imagery that complements and enhances a brand’s essence, ensuring it resonates with the intended audience while standing out… Read more: Brand identity elements
 - 100 Best Mountain Captions and Mountain Quotes for Instagram
 Ready to scale new social media heights? Look no further than this treasure trove of 100 exhilarating captions and quotes, handpicked for your Instagram mountain posts!
 - Symmetry in Photography: A Creative Approach with Examples
 Delve into the enchanting realm of symmetry in photography as we showcase mesmerizing examples on our website. Experience the allure of perfectly mirrored images!
 - 11 Quarantine Photoshoot Ideas to Try at Home for Amazing Photos
 Looking for unique photoshoot ideas during quarantine? Explore the 11 creative suggestions that will help you capture unforgettable moments at home.
 - 10 Must-Try Spotlight Photoshoot Ideas and Tips
 Capturing the perfect shot requires creativity and attention to detail. Here are 10 fantastic ideas and tips to help you create stunning photos during your next spotlight photoshoot.
 - AI real estate photo editing
 AI Real Estate Photo Editing Real estate photography plays a important role in attracting potential buyers or renters, making it a crucial aspect of the industry. With the advent of artificial intelligence (AI), enhance a photo editing in real estate has undergone a transformative revolution. This paper delves into the evolution of AI-driven photo editing techniques, their rule of odds… Read more: AI real estate photo editing
 - Influential fashion photographers
 Fashion photography is an art form that transcends mere clothing displays. It’s a visual language that captures the zeitgeist of culture, beauty, and style. Throughout history, certain photographers have left an indelible mark on the fashion industry, shaping trends, challenging norms, and defining aesthetics. Here, we delve into the lives and works of some of the most influential fashion photographers… Read more: Influential fashion photographers
 - How to remove wrinkles in lightroom
 In Adobe Lightroom, you can remove wrinkles using various tools and adjustments to smoothen the skin. Here’s a general guideline on different ways of how to remove wrikles on Lightroom. Let’s dive in detail. Essential ways to know how to remove wrinkles in Lightroom AlainaSpread the love