
How to remove shadows in photoshop
Method 1. Remove Shadows in Photoshop with Patch Tool
Get Background Retouching Service
The Patch Tool is one of my favorite methods as it gives you more control over the entire process. In other words, you “tell” the program which area of the image you want to use in order to replace unwanted parts. So, Ps won’t choose the pixels randomly.
- Learn how to get Photoshop free in case you don’t have it.
1. Duplicate layer
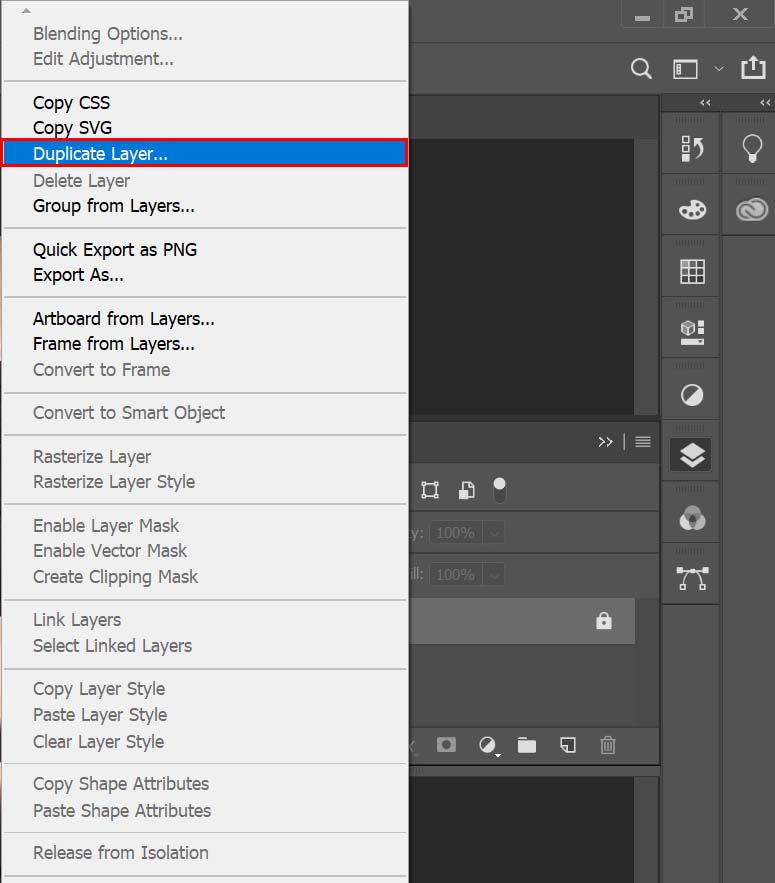
Duplicate certain layers every time you are going to make some changes and be sure that the original file is left intact. Even if something goes wrong, you can always return to the source file and start from the very beginning.
You can use the History Palate to undo an action, but if you have used hundreds of brush strokes and need to go back, it will become a real nightmare. That’s why, do the following:
- Drag the layer or a group to the “Create a New Layer” button.
- Find Duplicate Layer or Duplicate Group in the Layers menu or the Layers panel menu and select the necessary option.
- Press Ctrl+J
You will see a dialog box, where you need to name your new layer. Otherwise, it will be called by default name, which is the original Layer’s name + the word “copy”.
2. Select patch tool
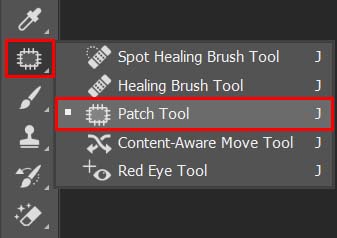
Open the toolbar in the left part of the panel and choose the Patch Tool.
Check in the “Content-Aware” box in the Patch dropdown menu. This is necessary if you want the software helps you create new pixels. Thus, you will be able to remove shadows from pictures as smoothly and accurately as possible.
3. Remove shadows
Primarily, you need to activate the Content-Aware Patch and draw a region around the culprit area. Next, move a cursor to the part of the photo that you want to replace it with and that can match the copied pixels.
It may seem a bit confusing at first, but treat it as something entertaining. As you move the cursor, you will see the selected pixels match the part they are going to be exported to.
Once you release the mouse button, the software will merge the edges. If you don’t like the result, you can regulate the Adaption settings in the Options bar that is below the menu bar.
You can choose very strict, very loose, or something in between.
Method 2. Use clone stamp and heling brush
In most cases, when a photographer has to remove something while editing images, he/she resorts to the Clone Stamp Tool or the Healing Brush. These tools help a lot when you need to erase an element from a shot completely, so they are definitely helpful when it comes to removing shadows from photos.
1. Duplicate the background layer
Repeat the same step you have in the previous method.
2. Select the clone stamp tool

There is the Tools menu on the left. Open it and choose the “Clone Stamp Tool”. There will appear a brush.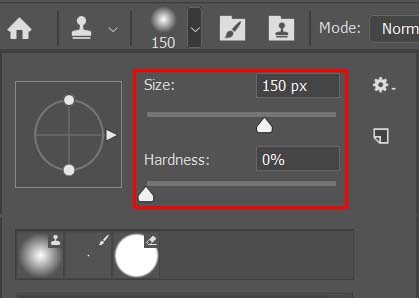
If needed, adjust the diameter of the brush. If you want to get the smooth edges, you need a soft brush. The easiest way to regulate the diameter of the brush is to hold “[“ to increase and “]” to decrease.
3. Choose the source
Next, you need to select the pixels that will be used to remove the shadow from the photo. Examine the picture, find a suitable part and move the cursor there.
In my case, I need to click on the area with water. Press Alt to confirm the chosen source pixels. The cursor will turn into a crosshair.
While clicking, the cursor will change and you will see the selected pixels.
4. Remove shadow
To remove shadows in Photoshop more accurately, you need to zoom an image in. Then, start painting over the shadow that you want to remove. To get a better result, use various pixels to paint over the shadows.
If it doesn’t look realistic, undo and take other clone sources, namely, pixels from another area of the picture, and try one more time.
If you need to return several steps back, take advantage of the Undo option. Cmd+Z for MacOS and Ctrl+Z for Windows. Sometimes, you need to try different “Opacity” values to see what works better in each individual case.
5. Finetune results with the healing brush
Remember to avoid repetitive patterns. These are the most evident signs that something was cloned and removed from a picture. Another tool that helps you finish the process of removing shadows from photos is the Healing Brush.
It works similarly to the Clone Stamp Tool, sampling pixels from the necessary area. However, the Healing Brush functions more accurately, since it makes the copied pixels identical to the new part of the photo in lighting and texture.
Method 3. Use adjusment layers
This is another fast and effective way to remove shadows in Photoshop. Ever thought! how to remove wrinkles in Lightroom? sounds great why delay give it a read.
1. Duplicate layer
Do the same as in methods #1 and #2.
2. Use magic wand tool
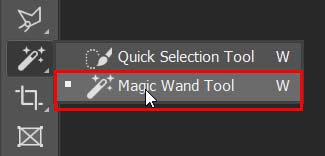
Find the Magic Wand Tool on the toolbar, activate it, and click on the shadows.
If you can’t select all the shadows, increase the Tolerance value and vice versa. When you are satisfied with the Tolerance, click on the shadow to make a new selection or use the Lasso tool/the Quick Selection Tool to do the same.
3. Create new layer
Choose “Layer/New Adjustment Layer/Brightness/Contrast/OK.”
4. Decrease brightness
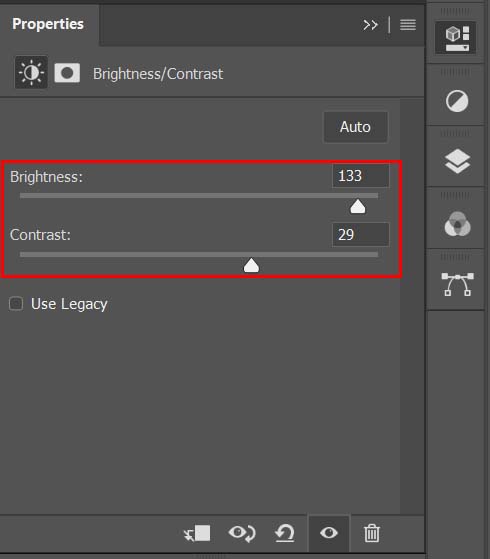
You need the brightness of the shadow to match the rest of the picture, so move the “Brightness” slider to the left until you like the result. Thus, the shadow becomes less bright.
Note: If you want to make some adjustments to the photo just let me know. I can do it for you at a very low cost. You can hire me to edit your photo.
- What is Midjourney
 Discover the capabilities of Midjourney AI, learn how to effectively utilize the platform, and explore the advantages and disadvantages of the Midjourney AI image generator across its different pricing options.
 - 100 Best Mountain Captions and Mountain Quotes for Instagram
 Ready to scale new social media heights? Look no further than this treasure trove of 100 exhilarating captions and quotes, handpicked for your Instagram mountain posts!
 - Symmetry in Photography: A Creative Approach with Examples
 Delve into the enchanting realm of symmetry in photography as we showcase mesmerizing examples on our website. Experience the allure of perfectly mirrored images!
 - 11 Quarantine Photoshoot Ideas to Try at Home for Amazing Photos
 Looking for unique photoshoot ideas during quarantine? Explore the 11 creative suggestions that will help you capture unforgettable moments at home.
 - 10 Must-Try Spotlight Photoshoot Ideas and Tips
 Capturing the perfect shot requires creativity and attention to detail. Here are 10 fantastic ideas and tips to help you create stunning photos during your next spotlight photoshoot.