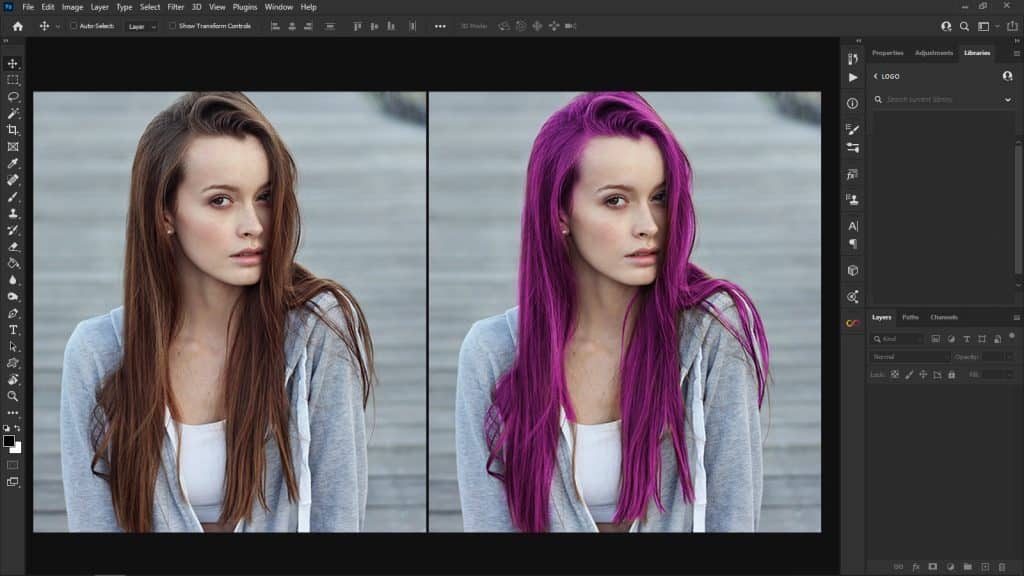
1. Grab the Quick Select Tool
Launch Photoshop. Upload the photo of your choice. Grab the Quick Select Tool (W) in the Tools panel.
2. Select the Hair
The next step of our change hair color Photoshop tutorial is selecting the hair. To include more areas, just click and drag over them. If you selected more than intended, you can remove content, by pressing the Alt/Opt keys as you click the part you want to remove.
3. Go to Select and Mask
To make our selection more accurate, click on the “Select and Mask’. You’ll see it in the Options Bar along the top. This will bring up a new window, where you’ll be able to further improve your selection.
4. Refine Edges
In a newly appeared window, you’ll see the toolbar on the left. It contains a bunch of tools that will help us refine our hair selection.
We’ll be using the Refine Edge Tool, as it’ the best for which is second from the top. It will help you deal even with the most difficult hair selections. Outline the rough edges to make the selection more accurate.
Remember, holding down the Alt/Opt keys will help you add or remove content from it.
5. Check the Boxes
After that, make sure to tick the boxes next to the “Smart Radius” and “Decontaminate Colors” options. The latter will help you fix any color fringing issues while the “Smart Radius” option will apply a smaller radius to clear-cut edges and a bigger one to more complicated ones.
Open the dropdown list next to the “Output to” box. Select “New Layer with Layer Mask.”
6. Confirm the Changes
Press “OK” to apply the changes. Once you’ve finalized them, your selection is ready.
7. Add 2 Adjustment Layers
Once you have done that, go to the Layers panel. If it’s not activated, you’ll find it under Window > Layers. If you’re a fan of Photoshop keyboard shortcuts, use the F7 key.
Then, activate the background layer. Add 2 adjustment layers: Hue/Saturation, Curves.
8. Click on the Clip Button
We don’t want our changes to be applied to all of the layers below. We only want to influence our current layer. In order to do this, click on the Clip Button on both Adjustment layers.
9. Use Curves to Alter the Color
Use the Curves tool to achieve the desired color. You may need to experiment with the values a bit to get the color you like.
10. Adjust the Color
Finally, we’re going to further adjust the color. Once the Hue/Saturation window pops up, use the 3 sliders to find the exact shade you want. The “Hue” slider alters the overall color, while “Saturation” is responsible for making it brighter or duller. “Lightness” can be used for light and dark adjustments.
Note: If you want to make some adjustments to the photo just let me know. I can do it for you at a very low cost. You can hire me to edit your photo.
- What is Midjourney
 Discover the capabilities of Midjourney AI, learn how to effectively utilize the platform, and explore the advantages and disadvantages of the Midjourney AI image generator across its different pricing options.
 - Brand identity elements
 In the vast marketing universe, imagery is pivotal in establishing and nurturing a brand’s identity. A brand’s visual choices are not merely aesthetic decisions but strategic moves that can significantly influence perception and performance. This Picfixs article explores the intricacies of selecting imagery that complements and enhances a brand’s essence, ensuring it resonates with the… Read more: Brand identity elements
 - 100 Best Mountain Captions and Mountain Quotes for Instagram
 Ready to scale new social media heights? Look no further than this treasure trove of 100 exhilarating captions and quotes, handpicked for your Instagram mountain posts!
 - Symmetry in Photography: A Creative Approach with Examples
 Delve into the enchanting realm of symmetry in photography as we showcase mesmerizing examples on our website. Experience the allure of perfectly mirrored images!
 - 11 Quarantine Photoshoot Ideas to Try at Home for Amazing Photos
 Looking for unique photoshoot ideas during quarantine? Explore the 11 creative suggestions that will help you capture unforgettable moments at home.