Learning how to hold a camera may seem silly at first. But consider this: have you ever considered whether you’re holding your camera correctly? Typically, we are so excited when our new camera arrives that we rarely consider the proper way to hold a camera. We simply grab our new favorite toy and begin shooting.
However, keep in mind that the way you hold the camera can have a significant impact on how focused your images are. Blurry images can be caused by two different factors. First, when the subject is moving quickly and we have no control over it. The only way to freeze our subjects’ movements is to increase our shutter speed.
The second factor influencing the focus of your images is how you hold your camera. If you don’t hold it correctly, you’ll get a camera shake and blurry photos.
This article will teach you how to properly hold a camera and will provide you with tips and tricks that you may not have considered before. Let’s get this party started!
How to Hold a Camera
As previously stated, adjusting your shutter speeds is the best way to avoid blurry photos. Investing in a tripod is also a great way to gain extra stability. However, if you must hold your camera, which is the majority of the time, certain techniques can assist you in doing so correctly. Here are our top six camera-handling tips to give you more control over your photography.
Keep your elbows tucked
By holding your camera with your elbows tucked under and close to your body, you will provide additional support for the camera’s balance. I’ve seen photographers shoot incorrectly by holding the camera with their elbows sprawled out far from their bodies. By keeping your arms close to your body, you can stay in line with your center of gravity and avoid swaying or moving at a variety of shutter speeds.
Place your legs body width apart
As with your elbows, it’s critical to keep your legs’ body width apart to help you find your centre of gravity. This works with either a digital camera or a smartphone. You can provide more stability and a more stable picture by finding your centre and a good position to stand-in. If you want the best stability, you must plant your feet firmly and flatly.
Lean Against a Stable Surface
Finding a supportive surface to lean against, such as a wall, is another technique for holding a camera. Holding your camera close to a wall will give you a little more stabilisation. Make sure each hand is tightly gripping the camera, one underneath the camera as lens support and the other on the side of the shutter release button.
Stand Up Straight
It makes no difference whether you’re shooting in low or high light. What is important is that you stand up straight, with your feet acting as anchors, while resting your elbow on the ground and gripping your camera. As previously stated, standing up straight will help you regain your centre of gravity, which is necessary for properly holding your camera.
Placement of Your Hands
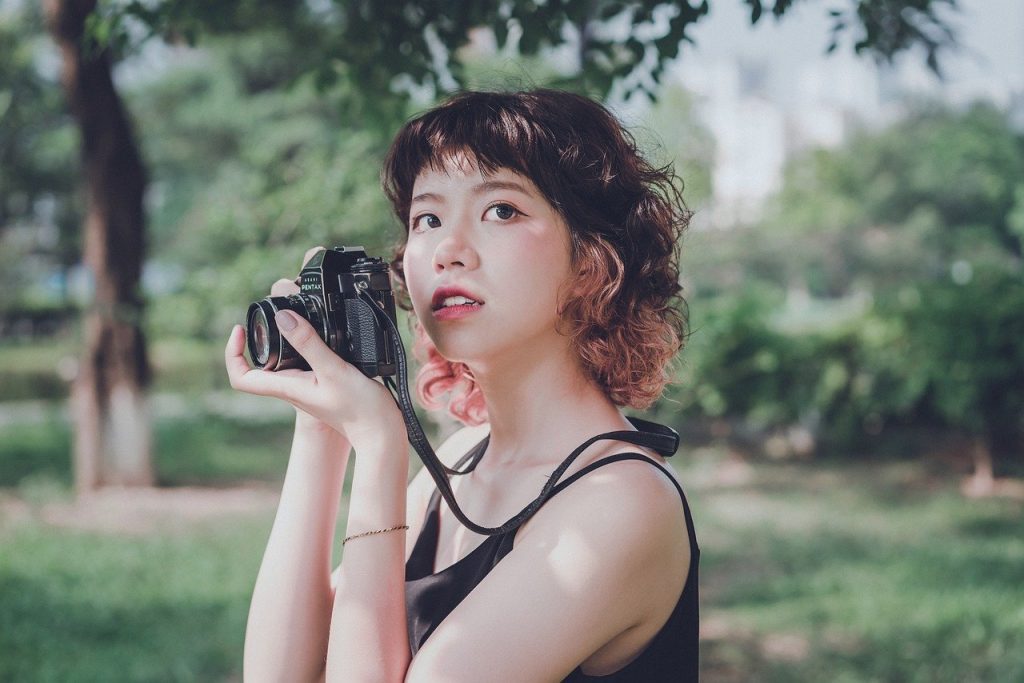
Remember to grip the end of your cameras with your right hand. Your forefinger should be just above the shutter release, and the rest of your hand and fingers should be curled around the front of your camera. Most cameras come with a grip, which you can use to place your right thumb. Hold your camera tightly but not so tightly that you feel shaky or unnatural.
After that, use your left hand to support the weight of the camera or lens. When shooting with small lenses, such as 50mm, your left hand will be on the camera. If you’re using a telephoto lens, however, you’ll need to support the lens with your left hand. The length of your lens will determine how you use your left arm.
Using a Camera Strap or Hand Strap
Investing in a good camera strap will not only keep your camera from falling to the ground, but it will also give you more control over your camera and help you avoid camera shake. On the market, there are numerous camera straps to choose from. Still, the most important feature is that it wraps around your body and securely connects to the bottom of your camera.
A camera hand strap, as opposed to a standard camera strap, only secures your hand to the camera. This will assist you in keeping your right hand wrapped around your DSLR as you point at your next subject.
Bonus Tip: Standing vs. Sitting
So you’re probably wondering how to hold a camera while sitting versus standing. Each can be held properly but in different ways. Consider these two distinctions the next time you try to steady your camera for a shot. Here are some tips from professional photographers.
Sitting
If you need to get down low while holding a camera, remember to sit flat on your backside and bend at the knees so your feet are firmly planted on the ground. To avoid camera shake, lean into your knees and rest your elbows on your knees. This is especially useful when shooting at slower shutter speeds, as it allows you to have more control. Each image has a distinct difference.
Standing
If you can’t find a wall against which to lean, try holding the camera on your shoulder or arm. To do this, wrap your left arm around yourself and tightly grip your right shoulder. Placing your camera on the upper part of your left arm or shoulder is a good idea.
If you need to shoot at a slow shutter speed but don’t have a tripod, this will greatly assist you in reducing the camera shake. This is an excellent cheat tip for maintaining a steady grip. The only issue that photographers have with this camera grip is that it restricts zoom and focus point control.
Portrait vs Landscape Mode

If you want more control over your images, think about how you hold your camera when shooting a vertical or horizontal image. The most important thing to remember when holding your camera for a landscape shot, as mentioned above, is to keep your elbows tucked tightly next to your body and the camera pressed firmly to your face for additional contact points.
It can be more difficult to keep your camera steady when shooting in a vertical or portrait orientation. This is due to the fact that one elbow is forced to be raised. However, to alleviate these issues, we recommend purchasing a battery grip that allows you faster access to your shutter release button. Nikon’s battery grip costs around $200.
Typical Mistakes
Consider these common blunders the next time you’re in charge of a camera. These are the most common mistakes we see photographers make when holding a DSLR.
- Holding your camera with a slow shutter speed. Anything less than a 50th of a second requires additional support or the use of the camera shake techniques listed below.
- Arms that are too far away from your body. Tuck your arms in close to your sides at all times.
- Stand on your tiptoes. If you’re trying to get to a higher position, instead of standing on something else, keep your feet firmly planted on the ground for the best control.
- Keep a firm grip on your camera to avoid camera shake. Too many inexperienced photographers fail to keep their cameras steady enough.
Conclusion
We hope you enjoyed this post, and we’d love to hear from you in the comments section below if you have any additional tips and tricks for holding a camera properly! Please contact us right away if you have any additional information on how you avoid blurry photography.
Note: If you want to make some adjustments to the photo just let me know. I can do it for you at a very low cost. You can hire me to edit your photo.
latest post
- What is Midjourney
 Discover the capabilities of Midjourney AI, learn how to effectively utilize the platform, and explore the advantages and disadvantages of the Midjourney AI image generator across its different pricing options.
 - Brand identity elements
 In the vast marketing universe, imagery is pivotal in establishing and nurturing a brand’s identity. A brand’s visual choices are not merely aesthetic decisions but strategic moves that can significantly influence perception and performance. This Picfixs article explores the intricacies of selecting imagery that complements and enhances a brand’s essence, ensuring it resonates with the… Read more: Brand identity elements
 - 100 Best Mountain Captions and Mountain Quotes for Instagram
 Ready to scale new social media heights? Look no further than this treasure trove of 100 exhilarating captions and quotes, handpicked for your Instagram mountain posts!
 - Symmetry in Photography: A Creative Approach with Examples
 Delve into the enchanting realm of symmetry in photography as we showcase mesmerizing examples on our website. Experience the allure of perfectly mirrored images!
 - 11 Quarantine Photoshoot Ideas to Try at Home for Amazing Photos
 Looking for unique photoshoot ideas during quarantine? Explore the 11 creative suggestions that will help you capture unforgettable moments at home.